So... I decided instead of just being so proud of the fact that I can now sew my hair when it's curly, I should make a video of it and share it with the entire world!!! Here it is!!! This is my first tutorial video and I'm doing my own hair so if not for anything else, watch to catch the awesome faces I'm making throughout. Next time I make one, I'll try and set music to it but for now, without sound will have to do. Enjoy!!!
Tuesday, December 11, 2012
Wednesday, December 5, 2012
It's Called a Filler.... I Guess :D
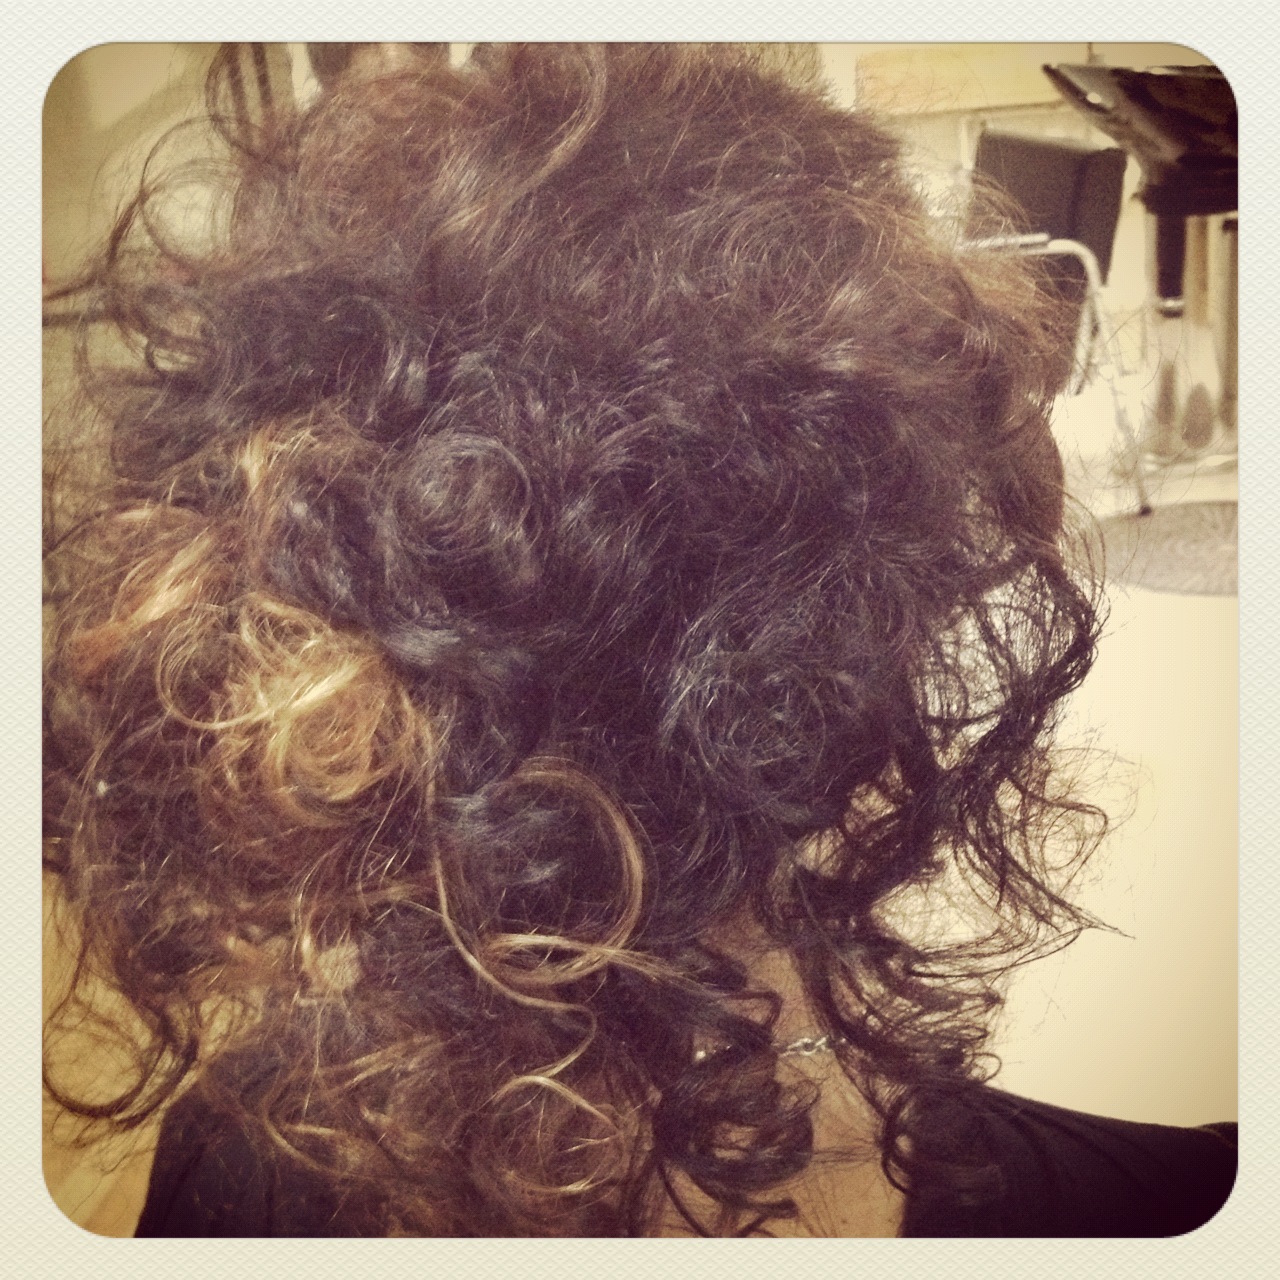
.JPG) This is a little something I threw together for a client who is getting married soon and wants unbelievably big hair :) I LOVE, LOVE, LOVE big hair, so this was a treat to be able to tell her that her dreams of big hair were possible When I sat her down for her consultation and gave her "the talk" about how in most photos with long luxurious or big hair, there's a lot of hair there that's was added to create a look. As I like to say, "There's a whole lotta weave up in that mess!!!" Haha!!! So I showed her the "filler" I made, she looked at is sideways after which I reassured her that it was definitely going to work and we moved forward with the style.
This is a little something I threw together for a client who is getting married soon and wants unbelievably big hair :) I LOVE, LOVE, LOVE big hair, so this was a treat to be able to tell her that her dreams of big hair were possible When I sat her down for her consultation and gave her "the talk" about how in most photos with long luxurious or big hair, there's a lot of hair there that's was added to create a look. As I like to say, "There's a whole lotta weave up in that mess!!!" Haha!!! So I showed her the "filler" I made, she looked at is sideways after which I reassured her that it was definitely going to work and we moved forward with the style.Here's how I did it:

 Materials Needed:
1 or 2 packs of braiding weave to match the hair color (cost $3-$5 a pack... no need to buy the good stuff!!)
netted wig cap or hair net (cost $1-$2)
wig brush/back combing brush ($.49-$5 depending on brand)
crafting thread ($3-$5)
crafting needle ($1-$2) Shhhh... I used my weave needle!! Ha!!!
scissors (Meh... I don't remember!! Ha!!)
Step 1: Remove braiding weave from package being careful not to let the hair separate. Tie a knot in the hair mid way down the length to create two equal sections of braid-able hair.

Step 2: Combine the braid-able sections and separate them into 3 equal sections.

Step 4: Backcomb the 3 equal sections you created.
.JPG)
Step 5: Braid the 3 backcombed sections. When you get to the end, combine the ends of each section and back comb them together to finish the braid.

Step 6: Take the braided weave and pack into the wig cap/hair net.

Step 7- Once the enclosure is sewn shut, cut off the excess wig cap/hair net.

Step 8- Viola'!!! Your filler is now complete and ready to mount on someone's head :D Marvel in your aweosomeness and take a bow!!
Beautiful right?!? I have to say, I was quite impressed with myself and my craftiness when I was done. Hopefully this is something you can apply to future crazy big updos or at home dos in place of crap tons of back combing. I think this is a great alternative to the God forsaken Bumpit and an easier to hide version of the loofa trick. Try it and let me know how it works out for you!!
Quick Tip: For an even more spectacularly voluminous look, add more hair to the hair net or make multiple fillers to pin or sew in.
Wednesday, November 28, 2012
So Far, So Good!!

Indigo is evidence that going forward with confidence and taking the steps you know are right can only bring abundance and prosperity. This is not to say that I'm rollin' in dough but I definitely have a full heart and am currently rolllin' in support and love from my family, friends and community.
Thank you!!
With that said, please stay tuned. I've got it at the top of my list to take more pictures, blog more (hopefully) and send out tangible thanks to those who have been so supportive in this new journey of mine!!
Follow Indigo:
Facebook- www.facebook.com/indigo253
Twitter- @indigo253
Instagram- Indigo253
Pinterest- Indigo253
Notice a theme?!? Hehe!!! Follow away my friends!!!
Tuesday, November 20, 2012
Aussie Inspired Portland Goodness!!!
 Boy
has life been busy!!! With my recent visit to New York, teaching
Davines classes and keeping my brain sane enough to keep business going
with all the "stuff" that needs to be done, I've been running around
like a crazy(er) person!!! Amongst the busy, I was able to make it to Kevin Murphy
Runway to Reality ft David Bamford show in Portland that I feel like
I've been waiting FOREVER for. I have to say, watching the creative
mastery of David Bamford was enough to jump start my creative heart and
get the juices flowing again. Stylists need ample opportunity to feed off
the creative energy of others and I think this show provided enough to
last me for quite a while.
Boy
has life been busy!!! With my recent visit to New York, teaching
Davines classes and keeping my brain sane enough to keep business going
with all the "stuff" that needs to be done, I've been running around
like a crazy(er) person!!! Amongst the busy, I was able to make it to Kevin Murphy
Runway to Reality ft David Bamford show in Portland that I feel like
I've been waiting FOREVER for. I have to say, watching the creative
mastery of David Bamford was enough to jump start my creative heart and
get the juices flowing again. Stylists need ample opportunity to feed off
the creative energy of others and I think this show provided enough to
last me for quite a while.

Credits:
Pictures: Me and my iPhone :D
Hair: David Bamford
Makeup: I'm not sure but she did a fantastic job!!!
Thursday, November 8, 2012
Magic I Say!!!!

I've taken it upon myself to make sure that I apply this goodness to my hair just about daily and I am thoroughly amazed at how shiny and frizz-less my hair has been. With the weather being all Washington like, my hair's typical reaction is to freak out and fro. Momo/Cream keeps all this craziness under control.... Fo real!!! It is definitely quite magical!!!
Friday, November 2, 2012
I HEART CHALKBOARDS!!!!

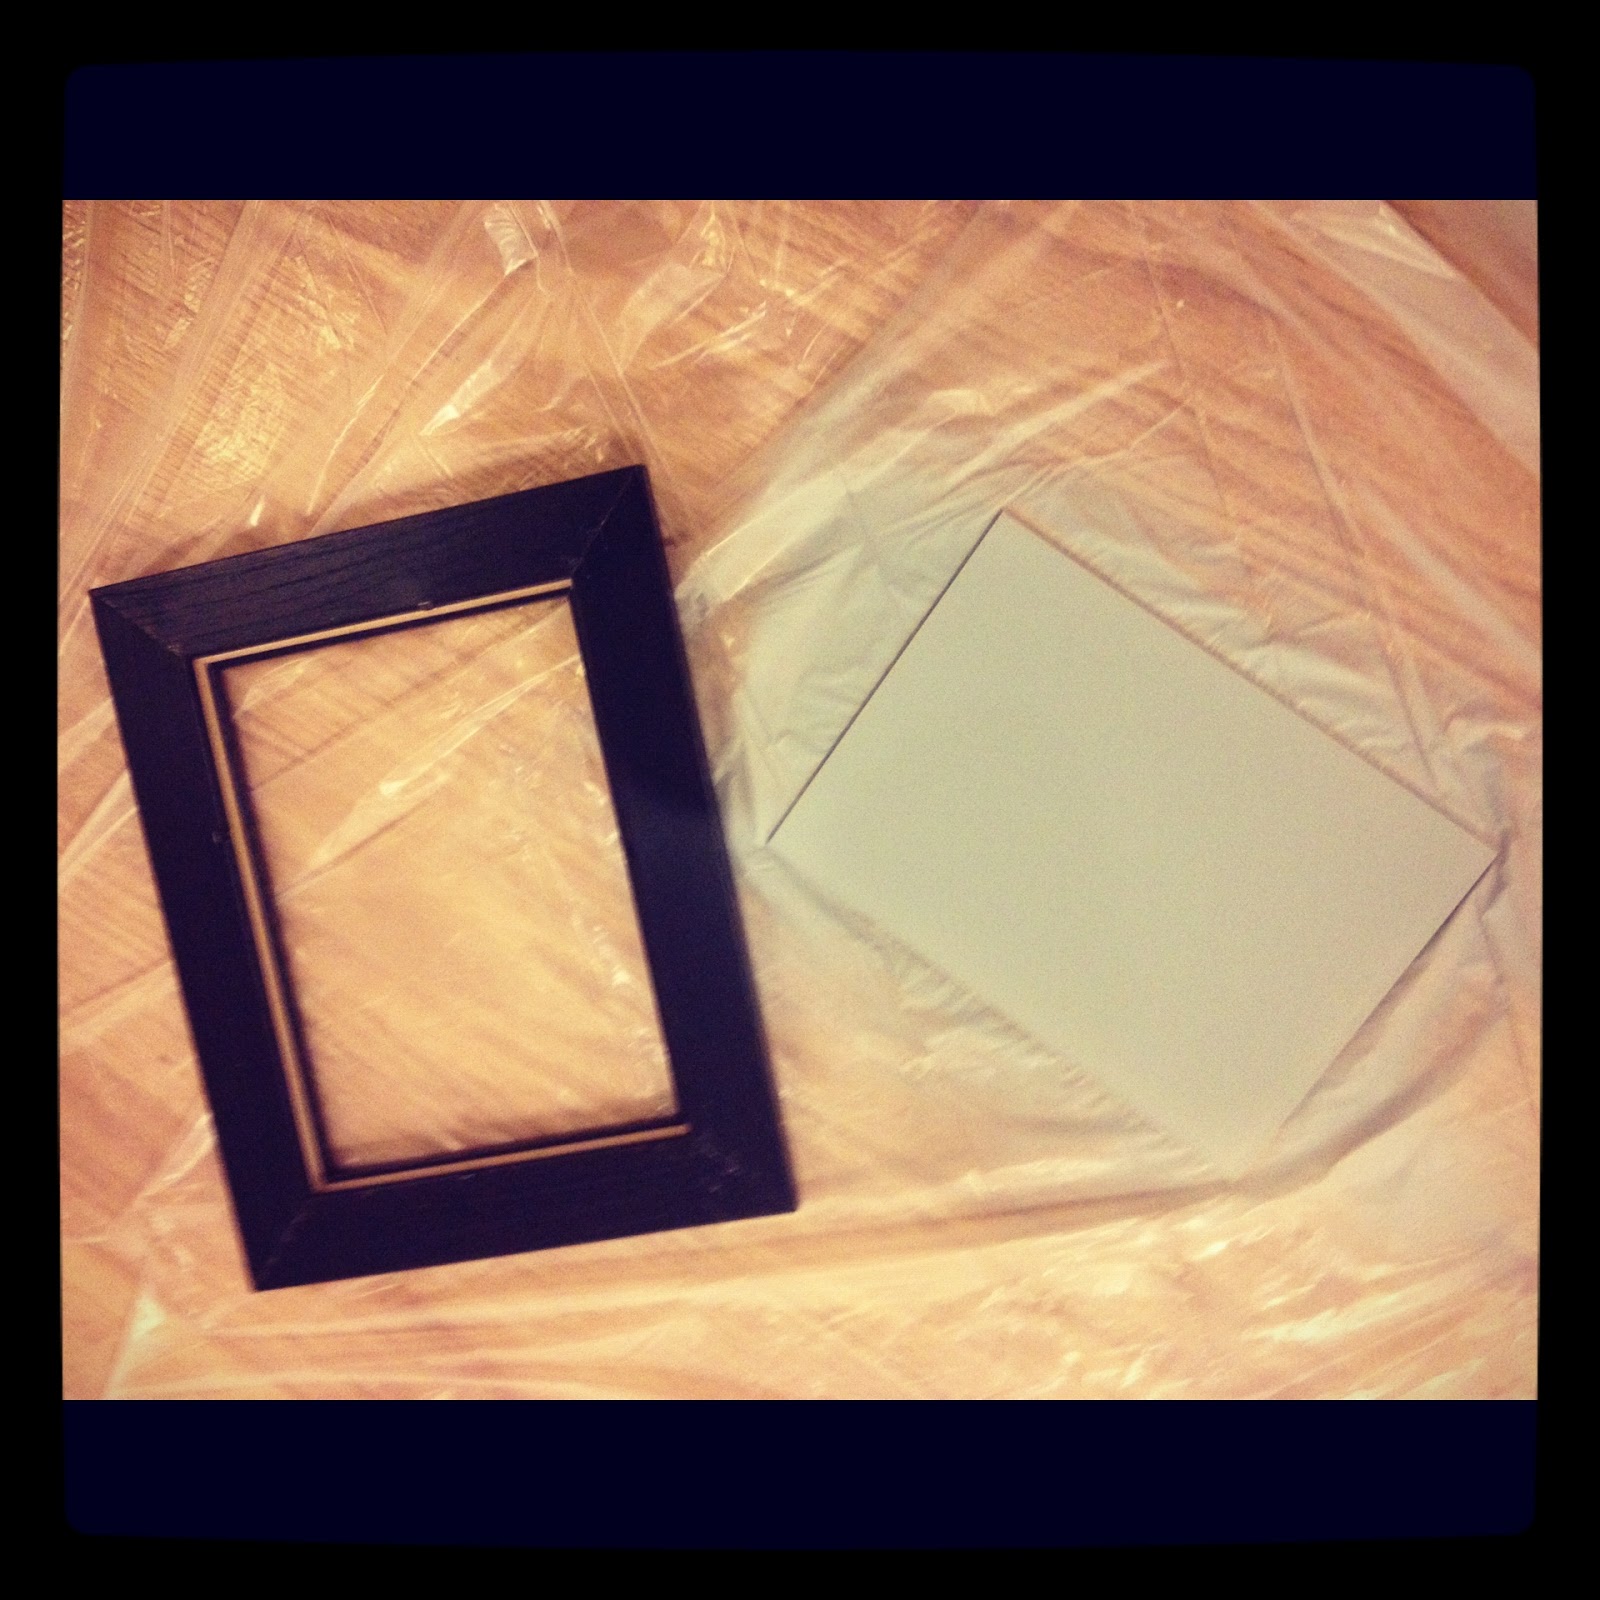
Knowing that I have a limited budget for decor, I took it upon myself to hit up Pinterest for some easy DIY projects to spruce up my space AND keep me busy during down time. This first project I embarked on was a "5 Minute Frame Fix" on a DIY site called The Yellow Cape Cod. Honestly, this is only one of many projects that I found that I want to try but I chose this one first because it was easy and let's face it, I HEART CHALK BOARDS!!!! Now that I have a whole can of chalkboard paint, expect that many of the surfaces in Indigo will be coated with said awesomeness.
Ok... So here's how I did it:

Step 1: Buy a picture frame!! Easy enough right?!? I chose this one because I couldn't find a vintage-y one that still had a paint-able surface like the original tutorial. This Ikea frame is perfect since all the pieces come in an easy to access package!! Ha!!
Step 2: Take the frame apart, prime and paint the glass with chalk board paint. To ensure an even surface, I used two coats of the chalk board paint.

Step 3: Once the chalk board paint is dry, put the frame back together. At first I was going to leave out the white piece but last minute decided to keep it cause it gives my lil DIY project a nice classy finish.

Step 4: Remember to bring your chalk with you so when you take a picture of the finished product you can write something cool on it to showcase your awesome project!! Haha!! I left my chalk at home so I'll have to wait until the next time I'm in the shop to write something clever.... I should be able to come up with something good!! ;)
Well, there you go!!! This was a really fun project that kept my self diagnosed ADD in check because I was able to do 5 other projects simultaneously while the coats of primer and paint were drying. Try this at home. I originally intended to make this an "open/closed/BRB" sign but I think I'm gonna set it on my station so I can bask in its awesomeness!!! Can't wait to write cool stuff on it!!!!
Thursday, November 1, 2012
And So It Begins...
 T-Minus 1 hour until I can officially say that Indigo has completed its first day of business. Crazy right?!? All of this has happened so fast but also seems like it's taken forever to get to this place. I'm feeling quite blessed to be able to say that I am open for business and am excited for the journey that lay ahead.
I had my first official client today. A simple haircut on a client who I've seen for a long time. I think the biggest worry for most stylists when they move on is that their clients won't follow. I'm glad to know that I have a good group of peeps who love what I do and love that I love doing it for them.... Say that 5 times fast!!! Ha!!
Also...
I received a visit from the gal who owns the salon upstairs, Azarra. I totally planned on popping up there once I got some stuff done but she beat me to it!! Ha!!! She introduced herself and even said that if I did relaxers that she could have sent me a client. Sadly, I don't BUT it was reassuring to know that I have her support and things don't have to be weird!! Haha!!
All in all, today was a good day. I got a lot of stuff done and feel good about my future here. Best part is, I get to do it all again tomorrow!!! Yippeeeeeeee!!!!
Subscribe to:
Posts (Atom)